Ok after much time and hard work, here is the promised wing chair tutorial. First,


BEFORE AFTER
I found two of these wing chairs on craigslist for 5 bucks each!!! They were structurally sound and comfortable to sit on, which I did even though they were yucky. The previous owner had cats...need I say more? At first I was just going to shampoo the chairs and then attempt to half-slip cover them but after attempting to clean them, I decided that I didn't want to waste all that time and have my new fabric smell like cat. So I looked around the web for other tutorials and since they were only 5 bucks each, I decided that it was worth it to just rip em up and try, plus I got all the fabric for both chairs for 15 bucks total on clearance! You can't tell very well from the pics, but it is a brown and cream diagonal stripe which looks like tweed, I think anyway.
I reused all the parts of the chair including the piping, carboard strips, most of the cotton, and the cushions. So the only costs were the fabric, staples, staple gun, and some batting. Without the cost of the staple gun, the whole project including the chairs cost a whopping $30.00!!
Okay, here is what you need to start:
CHAIR
FABRIC- upholstry fabric or other heavy weight fabric---I used 8 yards because I had two chairs
STAPLE GUN--I used a manual PowerShot from Home Depot
STAPLES--1/2 INCH
NEEDLE NOSE PLIERS
FLAT HEAD SCREWDRIVER--I used an old kitchen knife until i broke the tip off, then bought a tack puller from Home Depot, which i recomend, it was easier
HAMMER
UPHOLSTRY THREAD
SEWING MACHINE
HAND SEWING NEEDLE
The first thing I did was to flip the chair over, with the seat balanced on my knees. I had already cut the black fabric off the bottom because some moths had taken up residence and I needed to get them out before I brought the chairs inside.
Then the first step is to pull out all the staples from the chair bottom, which is about 4 layers. Slip your tool (screw driver, old knife, tack puller) under the staple and pull upward until it either comes out all the way or at least most of the way. Do a part at a time like this, then go back and pull the staple all the way out using your needle nose pliers. I put my staples in an old dixie cup.
Your four layers are a cardboard strip, then the black fabric, then the piping, and lastly the chair fabric. Remember to label all the parts that you take off so you remember where they go when its time to put them back on.
Next, flip the chair upright and insert your screw driver or pliers in the side and pry up the tack strip on the sides of the chair. It should come out fairly easily but be careful that you don't bend it too much.
Now, do the same to the top, but this time there should be metal "teeth" holding the top on. Pry down, then carefully pull out the old fabric. Those teeth are sharp!
Now take the entire back off and set it aside after labeling it. I left the tack strip in the old fabric so I wouldn't lose it or poke myself with it! This is what your back should look like, or something close to it anyway. Next I removed the staples from the teeth, and then from the entire back of the chair. Remove all the staples that you can get to. Then remove the cotton and lable and set it aside. I reused the cotton on most of the chair except for the bottom of the seat where the cats sprayed.
Then pry the cover off the front of the arm and remove the staples.
Flip up the side and remove the cardboard strip, lable and set it aside. Next, remove the staples from the two layers of side fabric. Set the side fabric with the cotton still on it aside after labeling.
Now remove all the staples from that "hole" where the seat fabric has been pulled through and alonside the front seat corner.
Here is what you should have after you remove the side panel.
Now on the the outer wing removal...Start at the top where you will probably find those metal "teeth" again. Do it just like you did the back. Remove that and the teeth and all other staples that you find.
Then where the teeth stop, flip the fabric to the right and you will find the rest attached with a cardboard strip.
Then remove the piping...
And the rest of the staples...Then repeat the previous steps for the other side.
You should now be able to pull the seat back fabric off, lable and set aside.
I flipped the foam and cotton up so I could see to remove the inner wings and armrest fabric. You may have to remove some hidden staples. Don't pull too hard or you may rip the fabric and you will want to reuse it as a pattern to cut the new stuff!
Now remove the seat bottom. it will be sewn where the different colored fabrics meet, just cut the strings with scissors.
Naked!!!
I removed the cotton from the seat bottom because it smelled like cat spray. I used an old pillow to replace it. My son called this the "Cloud Chair" and wanted to keep it this way!
Getting the chair to this point took FOREVER!!! A good two days just to get this far. The second chair only took about 4 hours because at that point I knew what I was doing, and I wasn't stopping to take pictures : )
Now here is where you need to lay out all of your old fabric pieces and use them as a pattern for the new fabric. Sadly I forgot to take pics of this step but it is pretty easy, just MAKE SURE that you add an extra couple inches all around the pieces because most likely the old ones were trimmed after they were stapled on. Also if you have directional fabric, pay attention to which piece you are cutting and where it will go on the chair.
The bottom seat piece is usually out of two different fabrics. Take it apart with a seam ripper or scissors, then lay it out and cut it. Then sew it back together. I covered my chair cotton in batting as I went along so that the cotton wouldn't bunch up while I was attaching the new facric.
The seat piece will need to be hand sewn down with some long basting stitches. Just poke down through the seating and out the bottom. Try to make sure this part is straight, mine is slightly crooked on the first chair, but it's on the bottom so I didn't worry about it!
Here it is half-sewn...
Now, flip the fabric to the back and pull it through. Arrange the front and line up the corners, then staple the bottom front piece, placing staples about 1.5 inches apart.

Now around to the back, pull the fabric tight and put in a staple at the center, under the bottom rail. Then peek at the front to make sure it is how you want it and go back to the back and staple the rest down, double checking that it is pulled evenly taut. Leave the extra fabric hanging, you will trim it up later.
Now you do the same for the sides...
The completed bottom! Here I added batting to smooth out the armrests.
Now do the armrests, making sure they are smooth and tight.
Now my inner wing had a piece of piping sewn to it. Remove the old piping from the old fabric and sew some new fabric using a zipper foot on your sewing machine. I cut a 2 inch piece as long as the piping cord and folded it in half over the cord.
Then I sewed it to the bottom of my wing piece
And flipped it down...
Then attached the inner wing piece.
Then flipped the foam back down and applied my batting for smoothness. Next you apply the seat back fabric...pull all edges through to the backside and staple it down making sure you are tight and even without wrinkles.
Now sit the chair upright and attach the piping across the top. Make your piping just like you did for the inner wing piece except you will attach it using staples instead of sewing it down.
Okay. For the outer sides, I did this a little differently than it was done before. I HATE those metal teeth!!! So, I didn't use them! So there lol! I used the carboard strip to attach the side part but then I just hand stitched the top part down. It was so much easier and smoother looking! But you can reattach the teeth and use them if you prefer, I won't know! ;)
I somehow lost the picture of reattaching the side pieces. By this point you should get the idea of how it's done. Just reuse that cardboard piece then staple the side and bottom edges down.
Voila, the chair is almost done!
I put the old cushion on just to see how it would look.
Now I just pinned and hand-stitched the top of the back on. But again you can use the metal teeth.
Then I pulled and stapled the bottom tight except for the last 4 inches on each side...
Then here I did reuse the tack strip on the sides. It was a little tricky to make sure it was tight, but it worked and looked really good.
Just fold it over and bang it in with your hammer.
Now I flipped the chair over and stapled on the bottom piping just like before, then stapled on some new black fabric for the bottom. I didn't use the cardboard strips again, but you can if you want.
Almost done!
Now recover the arm decor piece and hammer back in place.
All that is left is to make the cushion cover.
The cushion kicked my butt-for lack of better terms. I washed both cushions in the washing machine which had mixed results. I have an agitator washer and it tore the crap out of one of the cushions, but on a good note, it removed any bad smells. When I have the cash, I may go get some more foam and cut a new cushion. I also will buy new piping. The old piping just would not stay nice and flat when attached to my new fabric. So I ripped it out and just did a plain cushion cover instead.
So here it is complete....and with the ottoman I reupholstered (tutorial coming soon) and some of the pillows I made to go with my chairs!

 AFTER
AFTER


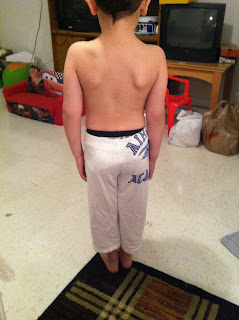
 Cut off both sleeves. You may have to adjust how much you cut into the shirt to allow for adequate crotch room. (the sleeve holes are your premade crotch!) Now cut off the shirt at the collar. Next, you can either cut the shirt in half up the middle, or if you don't want to cut through the design, cut up each side instead.